This guide assumes you have a working ocamlfind-enabled lablgtk2 installation on your system. If you’ve installed lablgtk2 in 2013 or later, you should be fine.
This tutorial explains how to create a window, add two buttons in it and print some text when they’re clicked.
It first goes through how to create that application by using an API that closely follow the one of GTK+ in C. It then does the same with the high-level lablgtk API which is very condensed and might therefore appear as magic if the foundations aren’t explained first.
GTK+ Concepts
-
Object: almost everything in the GTK+ world is an object of some sort.
-
Widget: graphical object.
-
Container: widget that can contain other widgets and arrange them in a specific manner.
-
Signal: message that is delivered to a GTK+ object.
-
Callback: function called upon delivery of a signal to an object.
-
Property: variable in an object; can be read-only or read-write.
-
Mainloop: the central loop in GTK+ which receives and handles events from the system and will therefore call the callbacks.
Creating A Window
let () =
  GMain.init ();                        (* Initialize Glib *)
  let w = GWindow.window () in          (* Create the window widget *)
  w#show ();                            (* show the window *)
  GMain.main ()                         (* start the mainloop *)
The first step is always to initialize GTK+. Otherwise you will get warning messages and a segfault (see the "Common mistake" section). It is only possible to call GTK+ functions after this.
The next step is to create a GtkWindow object with GWindow.window. This
function has a lot of optional arguments which will be mentioned and explained
later on. For now it will only be called with () in order to create a
window with default settings which are usually sane in GTK+.
All widget constructors in lablgtk follow the same naming
pattern: G<WidgetName>.<widget_name> <lots of optional arguments> ().
The trailing () is needed to actually cal the function rather than doing
partial application because of the optional arguments.
The modules which name start with Gtk instead of G are
lower level; they might be useful but you will not usually use them.
The window has to be shown after it has been created. All widgets except windows are shown by default so this is only needed for windows.
Finally we run the mainloop with GMain.main (). Note that this function
doesn’t return until the GUI exits. In other words, this is the function that
will do everything and the code that might appear after its call will only run
after the GUI has exited; this is why there is usually very little code after
it.
Setting Widget Properties
In order to change the size of the window, we can use the resize method; to
change the title we have the set_title method:
let () =
  GMain.init ();

  let w = GWindow.window () in
  w#resize 320 240;                (* Resize w to 320px tall and 240px wide *)
  w#set_title "Lablgtk2 Tutorial"; (* Set the title of the window *)

  w#show ();
  GMain.main ()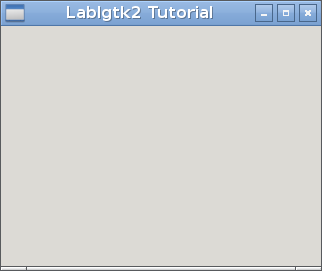
Containers
Now that the window is ready, we need to add a few widget in it.
Windows are containers which are limited to only one child. In order to have more (two buttons), we need to add another container that can have several children. A very common one is boxes, either vertical or horizontal.
Below we’re using a vertical box which arranges its children into a vertical stack.
let () =
  GMain.init ();

  let w = GWindow.window () in
  w#resize 320 240;
  w#set_title "Lablgtk2 Tutorial";

  let box = GPack.vbox () in (* Create the vertical box container *)
  w#add box#coerce;          (* Add the box in the window *)

  w#show ();
  GMain.main ()
By default, boxes fill all the space that is available (i.e. not used by something else). This is not visible in this sample code however since the box does not have a specific color; the screenshot for this code looks exactly like the previous one.
Note the line with w#add box#coerce. It adds the box in the window but box
isn’t a raw GTK+ object but an OCaml object which gives access to one; the
#coerce method is that accessor. The method add doesn’t do this
automatically because the type of the method would then forbid passing raw
GTK+ objects directly (which is useful in some cases).
let () =
  GMain.init ();

  let w = GWindow.window () in
  w#resize 320 240;
  w#set_title "Lablgtk2 Tutorial";

  let box = GPack.vbox () in
  w#add box#coerce;

  let button_click_me = GButton.button () in     (* Create the first button *)
  button_click_me#set_label "Click me!";         (* Set the button text *)
  box#pack button_click_me#coerce;               (* Add the button in the box *)

  let button_dont_click = GButton.button () in   (* Create the second button *)
  button_dont_click#set_label "Don't click me!"; (* Set the button text *)
  box#pack button_dont_click#coerce;             (* Add the button in the box *)

  w#show ();
  GMain.main ()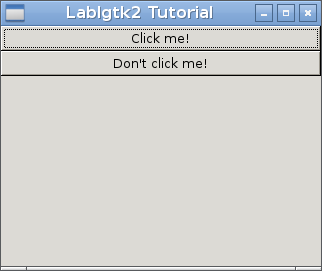
Callbacks
Our last step is to make clicking on the button trigger something. In GTK+, this is done through callbacks: functions which are called when some signal is fired.
This is achieved through the #connect method to widgets: it returns an object
which has a method for each available signal for the corresponding widget.
Therefore we will call button#connect#clicked and give it out callback
function.
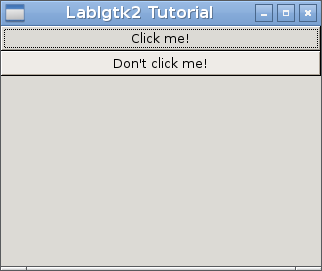
let () =
  GMain.init ();

  let w = GWindow.window () in
  w#resize 320 240;
  w#set_title "Lablgtk2 Tutorial";

  let box = GPack.vbox () in
  w#add box#coerce;

  let button_click_me = GButton.button () in
  button_click_me#set_label "Click me!";
  box#pack button_click_me#coerce;

  let button_dont_click = GButton.button () in
  button_dont_click#set_label "Don't click me!";
  box#pack button_dont_click#coerce;

  ignore (button_click_me#connect#clicked (fun _ -> print_endline "Yeah! =)"));
  ignore (button_dont_click#connect#clicked (fun _ -> print_endline "No! ='("));

  w#show ();
  GMain.main ()
When clicked, the buttons will print the corresponding messages on standard output.
The functions which add callbacks return an id which can later be used to
remove the callback. In our case we don’t need it so we just ignore it.
Taking Advantage of OCaml features: Optional And Labelled Arguments
Lablgtk has optional and labelled arguments in almost every function. For instance, the GWindow.window function has 21 optional arguments: there is one for each property of the object.
Without using optional arguments, we have to write:
  let w = GWindow.window () in
  w#resize 320 240;
  w#set_title "Lablgtk2 Tutorial"
If we leverage them, we can write:
  let w = GWindow.window
    ~width:320
    ~height:240
    ~title:"Lablgtk2 Tutorial"
()let () =
GMain.init ();
let w = GWindow.window
~width:320
~height:240
~title:"Lablgtk2 Tutorial"
()
in
let box = GPack.vbox ~packing:w#add () in
let button_click_me = GButton.button
~label:"Click me!"
~packing:box#pack
()
in
let button_dont_click = GButton.button
~label:"Don't click me!"
~packing:box#pack
()
in
ignore (button_click_me#connect#clicked (fun _ -> print_endline "Yeah! =)"));
ignore (button_dont_click#connect#clicked (fun _ -> print_endline "No! ='("));
w#show ();
GMain.main ()The result is the same:
This code doesn’t repeat most of the widget names which saves boilerplate and makes it both easier to read and to understand.
You can also save lines by putting most optional arguments on a single line but with 5 or 6 of them, this quickly becomes difficult to read.
|
Note
|
The default values for optional arguments are most often sensible. One
of the very few that needs some thinking is show: it defaults to true for
every type of widget except for windows, which is why a separate call to the
show method is needed. |
Common mistakes
GTK+ not initialized: GTK+ type-system failures and segfault
Not calling GMain.init () or similar before calling GTK+ functions always
ends up in a crash after, usually after a large number of error messages like
the following:
GLib-GObject-CRITICAL **: g_signal_connect_data: assertion `G_TYPE_CHECK_INSTANCE (instance)' failed
Gdk-CRITICAL **: IA__gdk_screen_get_default_colormap: assertion `GDK_IS_SCREEN
(screen)' failed
They key elements in these error messages is their relation to "types": they haven’t been initialized and GTK+ fails at everything it tries to do. Above, the acronym "IA" is also related to types.